Trends that 2017 had left us with the blessed powders to rub on the nails, Instagram and YouTube were flooded with videos showing the application. How not to fall in love? The part that may not be so simple is the gel / UV equipment, because for these holographic powders (or the same as the chrome) are good is almost essential to use them on a topcoat gel (of which are cured with UV lamp) and preferably of the non-wipe type (that is, of those that do not leave a sticky residue after curing with the lamp). Have a look at MsMee.com.
The instructions that are for Holographic Nails
- Apply base colour (in this case I went for plating)
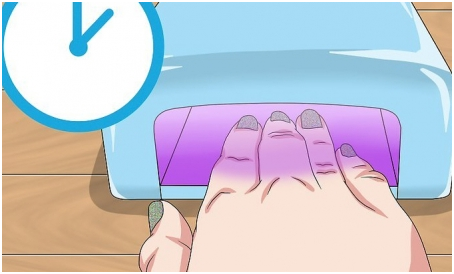
- Apply one coat of topcoat gel (no wipe) and cure with UV lamp as indicated on the enamel
- With a shade applicator (the typical sponges) lift a little dust and rub on the nail to achieve the desired effect
- Seal the work with another hand of topcoat gel
In retrospect, using a base silver was probably not the best option, below I show you a test in the nail with a dark blue base colour, the rainbow stands out much more. One thing that perplexed me is that I did not achieve the same effect on the different nails. For some reason in the little finger directly the holographic effect was not felt and on each finger the force was different. Obviously, I lack experience in everything that is UV or me need more practice with the application of dust.
Paint a base of solid black gel enamel , uncured add the mirror powder spreads enough to cover each indentation, take special care to cover everything, try not to make a dust disaster, the best technique is with the brushes to apply shadows of sponge, finish removing the excess gently to not take more than the account with the cleaning brush or fan brush, apply the top coat with care and cure 60 seconds in the lamp, and remove the remaining pegostoso with some enamel cleaner in gel or use alcohol, and your portable nails mirrors are ready.
First I will use a 3-sided buffer to prepare the nails, it is important to have the surface as smooth as possible so that it better reflects the brightness. In that case, I’ll start with the FILE face which means lime. It is a very soft file that will polish the surface of our nail eliminating the imperfections, which when taking the mirror powder would be noticed a lot.
The second step is to use the Buffer to smooth and shine. This operation is necessary; you will notice that they are ready when the surface is smooth and bright. If you have many grooves you can usually use a planer base before applying the nail polish. Still confused click Holographic Nails.
We have given two layers of this enamel but it is important that the second does not let it dry completely if the dust does not adhere. The mirror effect powder nº 1 can also be found in the store. It comes with an applicator similar to that of eyeshadows, but the material is much more like a makeup sponge. When applying the mirror effect powder it is very important that you deposit it gently on top, then do not think about squeezing too much. The movement has to be very smooth lest you lift the enamel that is not yet completely dry.